Search This Blog

Monday, December 31, 2012

New Years Eve Desserts - Black Forest Cheesecake


We did a very low key dinner at my parents' for New Years.  I offered to make dessert and decided on a very decadent black forest cheesecake. (Oh, by the way, I got a stand mixer for Christmas!!!)

Ingredients:

1 1/2 cup Oreo baking crumbs
1/4 cup butter, melted

3 pkgs (8 oz) cream cheese, room temperature
3/4 cup sugar
1 tsp vanilla
6 bars semi-sweet baking chocolate, melted
3 large eggs

1 can cherry pie filling

2 cups whipped cream

Directions:

1. Mix melted butter and Oreo baking crumbs.  Press into bottom of 10'' springform pan.  Set aside.


2. Cream sugar with cream cheese until smoothed.


3. Add vanilla and melted chocolate.  Mix thoroughly.


4. Add one egg at a time, but do not over mix.  Mix until just incorporated.

5. Pour half of the mix onto the crumb crust.

6. Drop 6 tbsp of cherry pie filling on the first layer of mix.  Lightly swirl to incorporate. 


7. Cover with remaining cheese mix.

8. Bake at 350 degrees for 50 minutes.

9. Chill for one to two hours.

10. Cover with remaining cherry pie filling.


11. Pipe whipped cream around top edges and decorate as desired (e.g. glazed cherries).


12. Enjoy.


Christmas Crafting - Rag Quilts

December has been a whirlwind.  I did a lot more crafting than I have blogged about and I have not been really on the ball about taking pictures.  My apologies.

Any ways, after making a rag quilt for a friend's soon to be new born, I decided to make quilts for my sister and my sister-in-law.  I picked out four colours/patterns in flannel for the front and a fleece for the back of each quilt.  I bought 2 metres of the fleece and 1/2 metre of each of the flannel colours/ patterns.

In a prior post I provided links to a couple tutorials that are really good explanations of how to make a rag quilt, so I won't provide details here.  Here are a few pictures from the last go round, but I realized that, brilliant me, I forgot to take pictures of the final products.  Sometime in the future I will update this post with final pictures of the blankets in use by the girls.


Friday, December 14, 2012

Christmas Crafting - Framed monogram

A little while ago, I tried making a monogram using rolls of book pages.  You can see the prior post here.

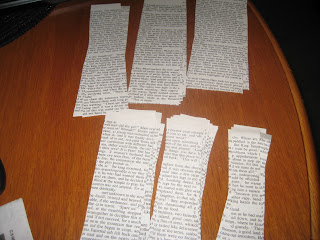
I loved this idea and now that I've tried it, I've thought of several ways to adapt this idea for gifts.  For my sister-in-law, as a Christmas gift, rather than making the monogram on a cutout letter, I bought a simple frame with a 1/4 inch plywood insert.I painted the insert red, and from there I cut out the necessary book page strips, rolled (using glue) 50 strips.


It's important that you have various lengths if you want to create the letter with tapering.  I used paper glue again, it seems to work well with both the rolls of paper and the wood.


As a final accent, I made two small felt flowers and attached those using a glue gun.


As an aside, I think this idea would be lovely if adapted for the first initial of a new baby's name, with suitable colours used.  For the book pages, you could use a children's book (at the very least, to be sure that no inappropriate words are visible).


Tuesday, December 4, 2012

Christmas Crafting - O' Christmas Wreath, O' Christmas Wreath

I earlier wrote about some of the fall wreaths I made last year (see With Fall Comes Wreaths for instructions and necessary materials - just change up the seasonal flowers, I find that Walmart usually has a great selection of faux flowers for Christmas at far more reasonable prices than Michaels).  I haven't had time to make any Christmas wreaths this year, but I made so many last year that I really don't have anyone left to give them to and my house only has so many doors.

Here's some pictures from the making of a couple Christmas wreaths that I gave to my parents and in-laws last year:


I also made a few for sale at my law firm's charity craft/bake sale last year for the annual United Way fundraising campaign, one of which is below:


I often found myself with too much ribbon or left over flowers, so I cut up some cardboard and glued it into the shape of small planters or vases.  I covered the cardboard with the left over ribbon and inserted flower Styrofoam, into which I placed the leftover flowers.  These actually turned out quite cute:


Saturday, November 24, 2012

Double diaper cake delight

As mentioned in the prior post, a friend's wife is expecting and I wanted to make a diaper cake for her.  I also promised to make one in a special Christmas theme, as the baby is due on Christmas day.

Diaper cakes are easy to make but are a little time consuming.  The design can incorporate baby items or can lean more to a traditional cake design.  I prefer a floral design.

Here is a list of required items:

- diapers (I typically use Huggies Pure and Natural in the <10lb and <14lb varieties)
- elastics
- bottles of baby lotion, shampoo etc.
- cake tray
- ribbon
- flower stems
- glue gun and glue


Steps:

1.  Roll the diapers and secure with elastics.  A three tier cake uses approximately 80 diapers.
2. Glue the bottle of lotion on to the center of the cake tray.
3. Place the diaper rolls around the base of the bottle of lotion and secure with an elastic.  Repeat twice more.


4. Start the second tier, which will require two rows of diaper rolls.  Secure with an elastic again.


5. Depending on the height of the interior bottle, you may need to add another bottle or container.  Secure one row of diaper rolls around the interior structure.
6. Apply the ribbon around each tier.


7. Fill the center with the flower stems and arrange flowers around the cake.


For the Christmas design, I limited the flowers to the top and applied two Christmas bows to the front.


I love how they turned out.  Hopefully the parents to be like them too.


Here's an updated picture from the baby shower today:


Somebody found her sewing machine!

Let's start by addressing the obvious question - how does someone misplace their sewing machine.  Easy, when we moved into the house, it was not unpacked right away.  I've been busy with work and haven't needed to sew anything until recently.  My husband wants new drapes for the front door and a few months ago he started cajoling me into looking for the box with the sewing machine.  I couldn't remember where it was!  So, I just let it rest for a while.

My friend's wife is pregnant and I wanted to make a few gifts (in addition to the diaper cakes that will be in the next post), so the search for the sewing machine began again.  Of course it was in the most obvious place (I have a spare room that was originally intended to be my home office but has become a bit of a storage space).

Anyways, sewing machine found, I bought some cotton prints, towels and flannel and have been sewing away each night this week.  I've made burp clothes, a bib, and a rag quilt.  I learned how to sew by age 5 but I haven't quilted in any style in YEARS.  I'm tickled pink with how the burp clothes turned out but I am particularly proud of this little rag quilt. 

I didn't remember to take pictures during the making of the burp clothes or most of the way through the quilt but here are some pictures of the final product.

Burp Clothes and Bib (Cotton prints and towels, patterns were free-styled on newsprint):


 Rag quilt:

 (This shows the rows of the squares of cotton, with flannel backing, lined up ready to attach each row together.)

 (Almost done, all rows together and time to cut into the edges to facilitate the fraying.)


 (All edges have been cut to help the fraying.  I hate this part, it feels like it takes forever!)


 (All washed and dried and frayed! Yea!!  Done!!)


I can't wait to give these to the parents-to-be!