Search This Blog

Wednesday, October 31, 2012

Hallowe'en - Painted Pumpkin Patch

Despite the lingering effects of Sandy (which was not terribly bad here, thankfully), we had a surprisingly decent number of kids show up for Hallowe'en.  My personal favourite costume was a very good Harry Potter, followed closely by a toddler in a monkey costume (adorable!).

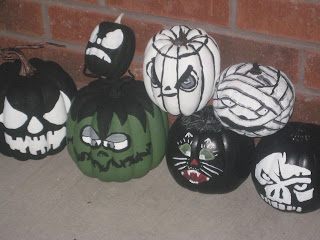
Because it was raining all week, we didn't put our decorations out until last night and I even waited until this evening to put out the pumpkins in case the winds picked up again.  However, when all was said and done, I was pleased with the plethora of painted pumpkins on my porch.  Here are a few pictures from earlier this evening.


Hope everyone had a safe and happy Hallowe'en!


Saturday, October 27, 2012

When a torte goes awry

Earlier this year, I came across a great recipe for a brownie torte.  The original recipe that the torte is based on is a Betty Crocker recipe.  It can be adapted for brownies made from scratch or your preferred box mix.  When I'm in a rush, I use Duncan Hines' new Decadent Triple Chocolate Brownie mix.  If making a recipe from scratch, I suggest that you also add chocolate chips or chunks for texture.

The steps are pretty easy:

1. Using whatever brownie mix you prefer, bake a 9 x 13 pan of brownies according to the recipe directions.

2. Cut the sheet of brownies into three equal sheets of brownies.

3. Place one layer on the cake sheet/serving tray.  Using homemade or store bought icing, microwave the icing for 20 seconds and stir.  Apply just under 1/3 of the icing to the first layer of brownie.

4. Repeat by adding the second layer of brownie and 1/3 of the icing.

5. Finish by adding the third layer of brownie and apply the remaining icing.  Smooth the icing over the whole torte and allow the icing to set and solidify.

I have made this for a few parties and every time the reaction is amazing.

Last night my Dad held his annual hallowe'en party.  I decided to make the torte again.  Because I didn't have a lot of time after work, admittedly I rushed the process a little bit and tried to start layering the torte before the brownies had cooled enough.  The top layer cracked apart into four pieces when I was placing it on top of the torte.  Since it was for a hallowe'en party, I decided to work with it, and made a decrepit tombstone dedicated to B. Rownie.

I also made a few Oreo cookie balls.  So easy!!!  Using a package of Oreo, create crumbs using the food processor.  I used half a package of cookies, to which I added half a package of cream cheese and mixed this.  Create bite sized balls and freeze them for at least 1/2 hour.  Melt four chocolate squares (I used semi-sweet but dark chocolate also works really well), with 1 teaspoon of butter.  Take the balls out of the freezer and use forks to roll the balls and coat them in the chocolate.  Place the balls back in the freezer for 1/2 hour.  For the party I finished them off with white icing piped "RIPs", and placed them on green icing intended to look like grass and moss.

The final product was much cuter than I thought it was going to be when the brownie first went awry (but definitely not my finest work):

Once again the reaction was overwhelming, the torte is to die for.  (Insert groan here.)

Wednesday, October 24, 2012

My fascination with fascinators

I'm too busy to load and post pictures of more recent crafting that I've done (plus I'm not too pleased with the outcome of a project that I will post about in the next week or so).  So, I figured it was time to reveal that one of my vices is fascinators.  I have always loved fascinators and ornate hair pieces.  I don't know if its my UK heritage coming through but I personally think that a fascinator is a mandatory accessory at any event for which you must dress up.  However, I can't bring myself to pay some of the prices out there for nice pieces. 

At some point last year, I decided that I had the crafting ability to make my own (flight of fancy, delusional thinking or naive exuberance - take your pick).  Somehow that resulted in me making more than 20 different fascinators (yes, I still have to find room for them all), including several for friends. 

I took a tonne of pictures (not all of them are very good, its time for a new camera) and figured I should post some here. Here are a few pictures of some of my favourite fascinators I made in 2011 and I'll post more when I have an occasion to make another piece:

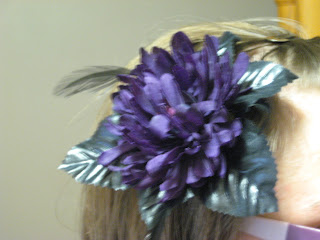
 The first is a small clip I wear to work occasionally.

 I love the combination of purple and black.


I quite liked this design and made it in several colours and materials.  The red and black is my favourite and really stands out.


These last two are smaller and great for everyday wear.

These are just a small selection and I'll try to add more pictures in the future.

Friday, October 19, 2012

A monogram with many words

My inspiration for a recent project comes from Little Things Bring Smiles (such an amazing blog!!!): Book Letters.  I instantly fell in love with the idea.  As a first try, I decided to make a monogram for our last name to hang by our front door.

What I used:

- book (this was difficult, but I found one that I had no intention of reading, so I didn't cut into any of my collection)
- paper craft glue
- wooden monogram (F)
- scissors
- felt
- glue gun

Start by cutting strips of pages from the book.


Once you have the strips cut, apply glue to the bottom third of one side (I used a paint brush, which worked quite well).

As you glue each strip, roll it up as tightly or as loosely as you desire. Once I was done rolling all the strips of paper, I laid the rolled page strips out to map out which piece would go where.


Then, one by one, glue the spot on the monogram letter and apply some glue to the roll and place it on the monogram.  I held each piece for 20-30 seconds before adding the next piece.  I also applied a little glue in between each roll.


Once the monogram is put together, cut out felt rounds to make small flowers.  Cut a round into a spiral and roll the felt into a tightly bound rosette.  I made three and used a glue gun to secure them into place.


I love the final product.  I'm thinking I may make a variation of this for my in-laws for Christmas.


Saturday, October 13, 2012

I think I'm addicted...

...to making painted pumpkins.  I couldn't help myself, I saw a couple more designs I wanted to paint, so I bought two more faux pumpkins to paint and spent a couple hours this afternoon painting more pumpkins.  At this point, my husband just shakes his head, but secretly, I know he loves them too.

For materials and tools, you can look at two prior posts describing what I prefer to use ("I take my pumpkins painted, not carved" and "Hallowe'en - My favourite crafting time of year").

Of course I made another black and white one with a "scary" face (e.g., more traditional jack-o-lantern, sans the carving of course).  I broke with my usual design esthetic (black and white) and made a green one that is a little bit Frankenstein inspired.


Black and White:
(The picture on my ipod was the inspiration, I found it by Googling "halloween scary face design".)


Frankenkin:

Both:


I think I need help - but they're so fun to make...  I'll be sure to put up a picture of the whole collection together on the front porch for Hallowe'en.

Thursday, October 11, 2012

I take my pumpkins painted, not carved

As I mentioned in a post earlier this week, last year I was on a Hallowe'en crafting roll and tried painting pumpkins for the first time.  I thought they turned out great and while I painted enough for a small army, I've already broken the brushes out for a few more this year.  I don't have the steadiest hand when it comes to painting but I think I still do a decent job.

This year, I did a few "scary" designs and a couple pretty designs.  All you need are funkins, crafting paint and paint brushes/sponges.  If you want to make "vases", you will also need silk flowers and your glue gun.

The starting point:


For the two vases, I actually used gourds and cut the tops off.

Base coats:


Scary no. 1:


I have a bit of a Tim Burton thing going on with a lot of my Hallowe'en decor.  Love his movies (Dark Shadows was fantastic)!


Scary no. 2:
I wasn't happy with the mummy until I dirtied it up with the grey.


Scary no. 3:


Not sure what this is supposed to be but I tried something different.  The lines make me think the Yankees, which is the stuff of nightmares.

Here's all three together:

You may have noticed the flowers behind the trio, those are for the vases.

Pretty no. 1 (sans flowers):


Pretty no. 2:


Monday, October 8, 2012

Hallowe'en - My favourite crafting time of year

I know its a few weeks away, but I love Hallowe'en!  Always have and always will.  My love for Hallowe'en probably dates back to my childhood and the fact that my Dad always made a big deal.  In fact, he still does and throws an annual party.

Last year, I went crafting crazy for Hallowe'en. My absolute favourite item was painted pumpkins.  Rather than carve our jack-o-lanterns, I decided to paint funkins and gourds.

I preferred a simple black and white design and tried both "creepy" designs for the front door and classier designs for the inside.  I loved making them so much that I made more than a dozen and gave some to my parents (for the party's decorations) and to my in-laws.

Here is a list of the items that you will need to make painted pumpkins:

Funkins, real pumpkins (washed and dried) or gourds
Acrylic paints in your preferred colours
Brushes and sponges of various sizes and shapes
Ribbon
Tulle
Faux gems or decals

The internet was a great source for designs (as was anything Tim Burton), but my personal favourite (the skull) actually came from the emblem of my hubby's favourite knife manufacturer (hubby is a collector).  Here's last year's lot, lord knows I'll make more this year: