Search This Blog

Showing posts with label Painting. Show all posts

Friday, December 14, 2012

Christmas Crafting - Framed monogram

A little while ago, I tried making a monogram using rolls of book pages.  You can see the prior post here.

I loved this idea and now that I've tried it, I've thought of several ways to adapt this idea for gifts.  For my sister-in-law, as a Christmas gift, rather than making the monogram on a cutout letter, I bought a simple frame with a 1/4 inch plywood insert.I painted the insert red, and from there I cut out the necessary book page strips, rolled (using glue) 50 strips.


It's important that you have various lengths if you want to create the letter with tapering.  I used paper glue again, it seems to work well with both the rolls of paper and the wood.


As a final accent, I made two small felt flowers and attached those using a glue gun.


As an aside, I think this idea would be lovely if adapted for the first initial of a new baby's name, with suitable colours used.  For the book pages, you could use a children's book (at the very least, to be sure that no inappropriate words are visible).


Tuesday, November 20, 2012

Christmas Crafting - Swirl Ornaments


I was inspired with the vases that I made as Christmas gifts and decided to give painted ornaments a try.  I've seen some great tutorials on these.  For example, Oh Sugarplum! has an entry on swirl ornaments (with a really cool tutorial on making marbleized ornaments as well).

I made eight, some with red and gold, some with blues and white.  My favourites though were a couple with blue, red and gold.  I used Folk Art Metallic paints for these.


Sunday, November 18, 2012

Christmas Crafting - Painted Vases


As I mentioned in my last post, I decided to make some painted vases as Christmas gifts this year.  This weekend marked the beginning of my Christmas crafting, I did a number of projects just to get a head start.  Since I'm planning on making a number of these painted vases, I figured I should start ASAP.

I tried two different techniques.

Air Blown Painted Vases:

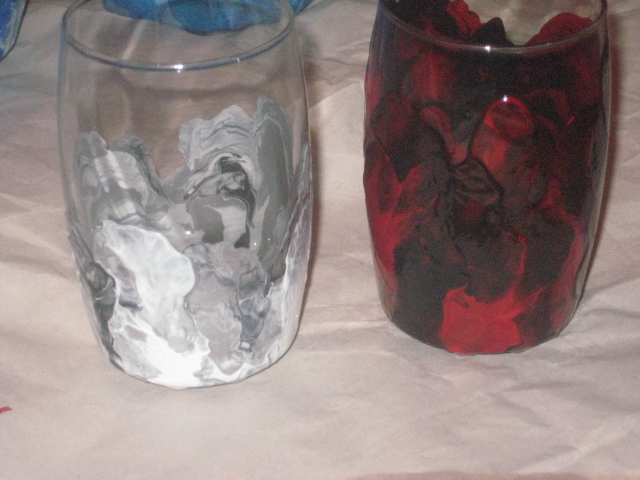
For these vases, I pick two - four colours and "dribble" a little of each colour around the bottom edge of the vase.  From there, I just blow on the paint until it is sufficiently spread around the entire vase and in a design that I like.  Using a straw works if you are worried about getting too close to the wet paint - yes, I have ended up with paint on my nose as a result of losing track of how close to the vase I was.

Once the vases are painted, I let them dry for at least two days and then pop them in the oven to bake in accordance with the instruction on the paint.  I tend to use Americana Gloss Enamels, but mostly because that's the only enamel product that the Michaels closest to me.


 (I store them upside down until the paint dries.)


Interior Swirled Painted Vases:

These ones are as simple as adding a few colours to the bottom (inside) of a vase and SLOWLY twirling the vase to coax the paint around and around until the entire interior is covered.  Additional drops of paint are added as necessary during the process.

When complete, drain the excess paint from the vase.  I stored my upright to dry because I purposely wanted some streaking to occur, caused by the wet paint wanting to pool in the bottom of the vase.  When the paint is dry for a couple days, I'm going to coat the inside with a varnish.


Its amazing what glue, paint and a canvas can become


Once again inspired by Pinterest (see here and here), I decided to continue adding to our wall decor with DIY projects rather than buying something at Homesense or the like.  I was really intrigued by some of the ideas using glue to create raised surfaces on painted canvases.

I ended up making a few different pieces.  I did a simple three piece set featuring concentric circles, a larger piece with multiple circles, and two pieces that I'm not quite sure what to do with yet (with script that didn't really work out as planned).

It really is as simple as drawing a design with the glue, waiting for it to dry and painting over it.


Once they are hung up, I'll post updated pictures.

Saturday, November 17, 2012

Painted Glass - First Attempt

I've been meaning to post this for a while now, and since I've been crafting all weekend, I have a backlog of posts to put up, so I might as well post some of the pieces I've completed in the past month or so.

As with many of my projects lately, I've seen a number of amazing ideas on Pinterest for painted vases and, of course, I figured I would try my hand at it.  I elected to use elastics and tape to make designs and painted a few dollar store vases with Americana Gloss Enamels.  Well, as will be clear below, I'm not trying that again any time soon.

However, in my frustration, I also tried another technique.  I splattered the paint around the bottom edge of a vase, using two colours, and gently blew on the paint to make it spread over the vase.  I adored how it turned out, so much so, I will be making a few more of these as Christmas gifts this year.  In fact, I've already started making a bunch more this weekend (post to come).

Here are pictures of the works in process:


(P.S. I'm loving Tim Hortons' Grey Cup themed coffee cup!)


Pictures of the final products (not my finest hour):


Pictures of the one that I actually like:

I'm already making more of these.  I love how the colours mixed as the paint was spreading around.  I will be posting more pictures of the process when I make a batch of these for Christmas gifts.