Search This Blog

Sunday, September 16, 2012

Boston Bruins Birthday Baking Bonaza

I couldn't help myself with the alliterative title.  Sorry for the nerd moment, but it was just begging to be done. 

Any ways, this weekend was my godson's birthday party.  His birthday's not until the end of the month, but if you have ever tried to rent a sheet of ice during hockey season (not the NHL type, since apparently that won't be happening), you will know that you take what you can get.

My godson is a huge hockey fan and a rather talented goalie in his own right.  For his 10th birthday, his mom (my bff) and I rented a sheet of ice for the boys (young and old), and planned a hockey themed party.  My godson's favourite NHL team is the Boston Bruins (despite living just outside of Toronto, he steadfastly refuses to cheer for the "Maple Laughs" as he calls them, but a big factor is that his uncle plays for Boston).

I offered to bake for the party and gave my godson a choice of the cake design he wanted.  He could pick either (a) a goalie pad designed sheet cake; (b) a hockey net, stick and puck; or (c) a round cake with a Boston Bruins design.  He picked the Bruins design (somewhat to my chagrin, since my piping skills need some work). 

Since I had so much fun making the Tye-Dyed Cupcakes a few weeks ago, I decided to make the Bruins logo cake and also cupcakes with swirl icing using the Boston Bruins' black and gold colours for icing.

As usual, when I'm making decorative cakes and cupcakes, I stuck to boxed mixes for simplicity and used Betty Crocker mixes (Devil's Food Cake and Chocolate Fudge) and frosting (Vanilla and Milk Chocolate) and Wilton food colouring and decorating tools.  Here's the pictures of the works in progress:

Boston Bruin Swirl Cupcakes:


 Boston Bruin Logo Cake:


Packed up and ready to go to the party:

Here are some pictures of the NHL themed decorations - honestly, its amazing what's available these days for planning partys.  Party City is a very dangerous store to be in for extended periods of time.


Here's the cake and cupcakes at the party.  I guess, based on the last picture, the cake went over well and maybe the sugar gave the boys some extra energy for when they went skating afterwards.  All in all, while the cake is not as clean as I would like, it was fun to make and it was a fun day overall (plus, I didn't fall on the ice!!!!).


Sunday, September 9, 2012

With Fall Comes Wreaths

Last fall, my favourite items to make were wreaths.  It seemed like any spare time I had was spent making wreaths for our house, friends and family.  My particular favourite design typically used the following:

Grapevine wreath
Fall bouquets (mums etc.)
Faux berries
Maple leaves
Homemade bows using wired ribbon
Glue gun
Grosgrain or satin ribbon (1" wide)

Typically, I lay out the flowers on the wreath to get a sense of how many I will need and then I wrap the wreath with the grosgrain/satin.  I also would use the grosgrain/satin ribbon to create the loop for hanging.  Before gluing the flowers into place, I attach the bow (usually at the bottom) using flower wire.

Next, starting at the top and working my way down to the bow, alternating sides to keep the design even, I glue the flowers into place using the glue gun.  Finally, I glue the finishing pieces (berries, leaves) into place.

Here are a couple of designs from last falls (I'll add more when I make some this year):


Sunday, September 2, 2012

Tie-Dyed Cupcakes

 For a neighbourhood party, where there were lots of kids, I decided to try Betty Crocker's Tie-Dye Cupcakes.  They turned out great and sort of inspired me to start this blog and are fittingly my first entry.

Basic ingredients are the following:

White cake mix
Water, Oil and Egg Whites (per instructions on the box)
2 Containers Fluffy White Icing
Food colouring
Cupcake liners
Cupcake pan
Multiple mixing bowls


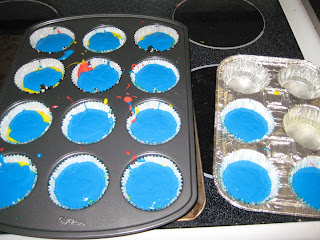
The batter is easy enough to make.  Simply follow the instructions on the box.  The original Betty Crocker recipe calls for six colours (red, orange, yellow, green, blue and purple).  However, the fun of this recipe is that you can pick how ever many colours you wish or the colours that work for a particular theme.  For the party, I pared the colours down to just the primary colours (red, yellow and blue).

Once your batter is made according to the instructions on the box, divide the batter evenly amongst three bowls or large measuring cups.  I prefer using food colour gels or pastes and only used 1/2 teaspoon to get the colours as strong as I wanted (I only use Wilton colouring products and for this recipe, I used Christmas Red, Sky Blue and Lemon Yellow).


Layer the colours in the paper liners.  You can switch up the order or make all cupcakes the same.  Fill to no more than 2/3 full.  I used two tablespoons of each colour.  Bake according to the instructions on the box.


The icing is coloured using the same shades.  I divided the icing evenly and used only one container other than the tubes the icing came in.  Again, I used less than 1/2 teaspoon to get the intensity I wanted to achieve.


Once the cupcakes are down, let them cool thoroughly, so as not to melt the icing.  They already look fun when they come out of the oven.


Icing is the most fun!  Spoon each of the colours into an icing bag and try to line them up side by side.  The bag definitely looks tie-dyed.  I suggest piping some out into a bowl until all of the colours are coming out at the same time, then ice away!


The cupcake and icing combination are a big hit with kids (and those who are kids at heart).  Apparently they went like hotcakes at the party, I think they were gone within the first hour.


I'm actually looking forward to the next kids party I have to attend just so I have an excuse to make these again!

Spare time? What spare time?

In my day job, I'm a business lawyer.  I love my job and my career, but it can be very stressful and my favourite de-stresser is crafting and baking.  In particular, this past year I've been very busy with all sorts of projects: fascinators, wreaths, flower arrangements, more fascinators, painted pumpkins, jewellery (which I kind of suck at) and all kinds of baked goods.

I see all of these amazing blogs with DIY ideas.  While I don't profess to be nearly as accomplished as the existing DIYers, I figured if I could even inspire one other person, the time it takes to put my ideas up on this blog will be worth it.  So here goes nothing, this is the beginning of the diarisation of my crafting journey.  I'll post as I complete projects, which may be as frequent as once or twice a week or as little as once a month, depending on what my work schedule allows.